
Microneedling at Home for Beginners: A Mindful Guide to Radiant Skin in 2026
What if the most effective way to restore your skin's youthful vitality wasn't a 500 dollar clinical appointment, but a quiet, ten minute ritual performed in your own sanctuary? It's natural to feel a bit overwhelmed by the 0.25mm needle talk or the fear of causing damage when you're just looking for a way to live more happily in your own skin. We believe that microneedling at home for beginners should feel like a gentle invitation to slow down, rather than a stressful medical procedure.
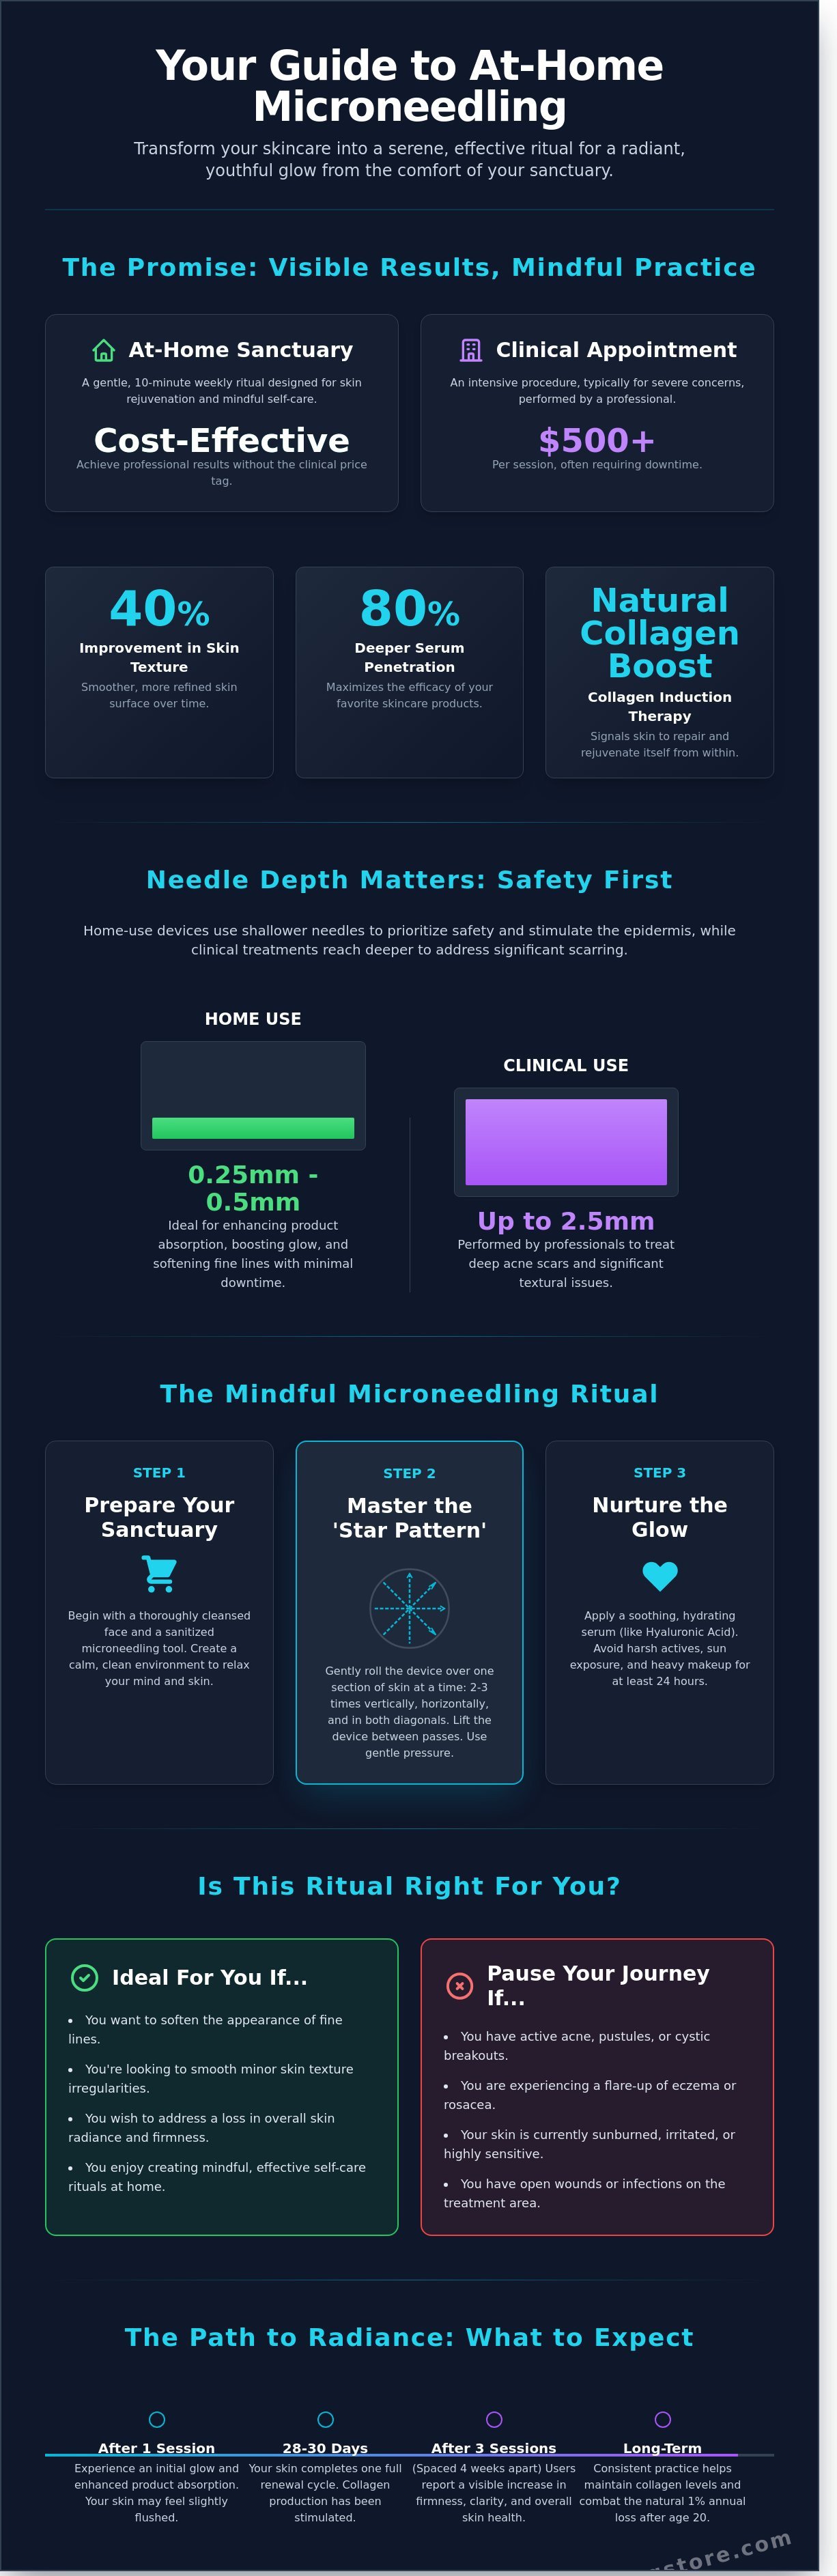
You're about to discover how to safely transform your evening routine into a serene practice that delivers professional results without the clinical price tag. We'll walk through the curated steps to improve your skin texture by 40 percent and ensure your serums penetrate deeper than ever before. This guide covers everything from needle selection to the exact 2026 safety protocols you need for a radiant, thoughtful glow. It's time to turn your bathroom into a haven of rejuvenation and find joy in the art of self-care.
Key Takeaways
- Transform your skincare into a restorative ritual by understanding how gentle micro-injuries invite your skin to produce collagen naturally.
- Navigate the world of microneedling at home for beginners with confidence by selecting the ideal 0.25mm to 0.3mm tools for a safe, domestic sanctuary.
- Master the mindful "Star Pattern" technique to ensure every inch of your skin receives the thoughtful attention it deserves for a balanced, radiant finish.
- Learn the art of post-treatment care, discovering which soothing ingredients to embrace and why avoiding harsh actives like Retinol is essential for your skin’s peace.
- Elevate your results by integrating modern light therapies that work in harmony with your microneedling practice to unveil a deeper, lasting glow.
Creating Your Sanctuary: An Introduction to At-Home Microneedling
Your bathroom is more than a place for utility; it's a haven where the day’s stress dissolves into the steam of a warm shower. As we move through 2026, the shift toward "pro-sumer" skincare has seen a 35% rise in high-quality, domestic tools that bridge the gap between the dermatologist's office and your vanity. Embracing microneedling at home for beginners isn't about chasing a fleeting trend. It's a soft invitation for your skin to bloom by producing collagen naturally. By choosing to integrate this practice into your weekly rhythm, you're not just performing a technical procedure; you're investing in a long-term relationship with your skin’s vitality.
The science behind this transformation is rooted in a process formally known as collagen induction therapy, which utilizes the body’s innate healing intelligence. When you glide a needle-studded device over your face, you aren't causing damage. Instead, you're creating thousands of microscopic, invisible pathways. These "micro-channels" act like a thirsty garden bed, allowing your favorite serums to penetrate up to 80% deeper than they would on the surface alone. This means your curated bottles of hyaluronic acid and vitamin C work significantly harder, turning every drop into a meaningful step toward a radiant complexion.
Beyond the technical results, there's a profound emotional benefit to this ritual. In a world that often feels rushed, taking twenty minutes to focus on your reflection becomes a moment of mindful self-care. It's a chance to slow down, breathe, and appreciate the small details of your skin's texture. When you approach microneedling at home for beginners with a sense of peace, the experience transforms from a task into a serene domestic ritual that celebrates your personal well-being.
Is Microneedling Right for Your Skin Journey?
Identifying if this path suits you is the first step toward a happy home spa experience. The ideal candidate is someone looking to soften fine lines, smooth out minor texture irregularities, or address a 20% loss in overall skin radiance. However, you should pause your journey if you're experiencing active acne, eczema, or sensitive skin flares. Safety is the cornerstone of beauty. Setting realistic expectations is vital; you won't see a total transformation overnight, but after three sessions spaced four weeks apart, many users report a visible increase in firmness and clarity.
The Beginner Mindset: Safety Meets Serenity
Microneedling is a controlled, minimally invasive technique for home use. Adopting a "slow and steady" philosophy ensures your skin remains happy and healthy throughout the process. It's essential to create a calm environment before you begin. Dim the lights, perhaps play a soft acoustic playlist, and ensure your space is impeccably clean. This reduces treatment anxiety and allows your nervous system to remain relaxed. When your mind is at ease, your skin is better prepared to receive the benefits of the treatment, making the entire process feel like a gentle, restorative embrace rather than a clinical chore.
The Science of Serenity: How Microneedling Transforms Your Skin
Your skin is a living tapestry, constantly weaving and renewing itself to protect your inner world. When you practice microneedling at home for beginners, you aren't just performing a beauty task; you're engaging in a mindful dialogue with your body's biology. The process relies on "micro-injuries," which are tiny, controlled channels created in the epidermis. These small interruptions signal your skin to enter a state of thoughtful repair. It triggers a natural healing response that feels like a quiet, restorative awakening for your complexion.
Depth is a crucial distinction for the home practitioner. While clinical treatments often reach depths of 2.5mm to address deep structural scarring, home devices typically stay between 0.25mm and 0.5mm. This shallower approach is intentional. It prioritizes the health of your skin barrier, ensuring your personal sanctuary remains protected while still encouraging a visible, healthy glow. Think of it as a gentle seasonal refresh rather than a heavy-handed renovation. By keeping the needles short, you minimize downtime and maximize the comfort of your evening ritual.
Collagen: The Architecture of Youthful Skin
Collagen and elastin act as the invisible scaffolding of your face. They provide the bounce and firmness we associate with vitality and health. Scientific data suggests that after the age of 20, our natural collagen production drops by about 1% every year. Microneedling serves as a soft wake-up call for these dormant fibers. Because the skin takes roughly 28 to 30 days to cycle through its renewal process, patience is a vital part of the ritual. You'll likely see the full bloom of your efforts after four to six weeks of consistent, thoughtful practice.
Absorption Power: Making Every Drop Count
The true magic happens when physical stimulation meets topical nutrition. Normally, the stratum corneum, which is the outermost layer of your skin, blocks more than 90% of the active ingredients in your skincare. By creating micro-channels, you can increase product absorption by up to 90%. This means your premium serums finally have the clear path they need to reach the layers where they can do the most good. This synergy transforms a simple routine into a potent act of self-care.
Understanding Post-Treatment Care and Essential Rituals helps you protect this newfound permeability while your skin moves through its healing phase. It makes every drop of your curated collection feel like a better investment in your long-term joy. When you microneedling at home for beginners, you're essentially opening the windows of your home to let the fresh air and sunlight in. It allows your skin to drink in the nutrients it craves.
Regular practice leads to a sense of resilience that reflects a well-lived life. Your skin becomes thicker and more capable of retaining moisture over time. This isn't about chasing an overnight miracle; it's about the steady, rhythmic care that leads to a youthful glow. You can curate your own sanctuary by selecting tools that turn these scientific principles into a relaxing daily habit that honors your natural beauty.
Choosing Your Ritual Tools: Needle Lengths and Device Basics
Creating a skincare sanctuary at home starts with selecting instruments that respect your skin’s natural boundaries. When you begin microneedling at home for beginners, your choice of tool defines the entire experience; it is the difference between a stressful chore and a meditative ritual. The goal isn't to cause trauma, but to gently whisper to your skin, encouraging it to renew itself through mindful stimulation.
The golden rule for safety centers on needle length. For those just starting, staying within the 0.25mm to 0.3mm range is essential. These shorter needles focus on the topmost layer of the skin, the stratum corneum. They don't reach the nerves or blood vessels, making the process virtually painless while increasing the absorption of your favorite serums by up to 90%. It's a gentle way to invite a natural glow without the downtime associated with clinical procedures.
Material choice is another pillar of a high-quality ritual. You will typically choose between stainless steel and titanium. Stainless steel is the gold standard for hygiene; it is a sterile, non-porous material used in 100% of surgical settings because it's easy to clean and naturally resistant to bacteria. Titanium needles are roughly 30% stronger and more durable, which prevents them from dulling quickly, but they require extra diligence during the disinfection process to maintain a pristine surface.
Manual rollers and electric pens offer different rhythms for your routine. A manual dermaroller allows for a tactile, slow-living approach where you control the pressure and pace with your own hand. Electric pens use a motorized pulsing motion, which can be faster but often feels more clinical. For a serene home environment, the rhythmic glide of a well-balanced roller often feels more grounded. Look for a device with an ergonomic handle and 540 perfectly aligned needles. If the needles are misaligned by even a fraction of a millimeter, they can cause unnecessary "track mark" scratches rather than clean micro-channels.
The Needle Length Guide for Home Users
Selecting the right depth is about intention. Use 0.25mm needles if your goal is daily-ish maintenance and maximizing the potency of your botanical oils. If you want to target fine lines or subtle texture changes, a 0.3mm to 0.5mm length is appropriate. However, safety is the foundation of domestic serenity. You should leave anything above 0.5mm to licensed professionals. To better understand the boundaries of home care, review this FDA information on microneedling risks, which outlines why deeper penetration requires a clinical environment.
Similarly, while at-home microneedling is excellent for texture, other concerns like stubborn pigmentation are often best addressed by clinical technologies like Pico lasers. If you're curious about professional options, you can visit Be-Youth for an example of what modern aesthetic centers offer.
Selecting Your First Professional Tool
Your first tool should feel like a natural extension of your hand. The Professional Micro Needle Roller is a thoughtful choice for beginners because it prioritizes precision and ease of use. When your package arrives, check for a sterile, tamper-evident seal and a dedicated protective case. These aren't just accessories; they're essential for keeping your tool free from dust and debris between uses. A comfortable, non-slip grip ensures your application remains steady and mindful, turning a simple beauty task into a cherished moment of self-care.
Your Step-by-Step Guide to a Mindful Microneedling Session
Transforming your bathroom into a personal sanctuary turns a simple skincare task into a grounding experience. When practicing microneedling at home for beginners, your environment matters as much as your technique. Dim the lights, play a playlist of soft acoustic melodies, and lay out a fresh, organic cotton towel. This is your time to slow down and honor the skin that protects you every day. By approaching this process with intentionality, you turn a clinical procedure into a restorative home ritual.
Step 1: The Cleansing Ritual
A pristine canvas is the foundation of safety. Begin with a double cleanse to dissolve the day's impurities. Use a gentle oil cleanser first to lift away debris, followed by a pH-balanced water-based wash to purify the pores. While your skin dries, submerge your derma roller in 70% isopropyl alcohol for exactly 10 minutes. This 600-second window ensures that 99.9% of bacteria are neutralized, protecting your delicate skin barrier from unwanted intruders. Your tools should be as pure as your intentions before you begin.
Step 2: The Rolling Technique
Consistency creates the most beautiful results. Divide your face into four distinct zones: the forehead, the cheeks, the chin, and the neck. This structured approach prevents you from over-treating one area while neglecting another. For each section, you'll follow a "star pattern" to ensure even coverage. Apply steady, gentle pressure; it should feel like a mild tingle, never a sharp pain. You're aiming for a soft pink glow, not discomfort.
Follow this rhythmic pattern for each zone:
- Roll 4 to 5 times horizontally across the area.
- Roll 4 to 5 times vertically from top to bottom.
- Roll 4 to 5 times diagonally to complete the star shape.
Always lift the roller completely off your skin between every single pass to prevent dragging or creating micro-tears in the epidermis. This mindful movement ensures the needles enter and exit at a 90-degree angle. By following this precise technique, you create thousands of tiny pathways that signal your body to produce fresh collagen. Take your time. There's no need to rush the process of renewal.
Step 3: Aftercare and Serenity
The moments immediately following your session are when your skin is most receptive. While these micro-channels are open, apply a Hydrating Face Serum to deeply nourish the deeper layers of your skin. The absorption rate of active ingredients can increase by up to 300% during this critical window. Avoid the temptation to apply makeup or heavy foundations for at least 24 hours. Your skin needs a full day to breathe and begin its natural repair cycle without interference from synthetic pigments or harsh UV rays.
End your ritual with a quiet moment of gratitude. Look in the mirror and acknowledge the strength and resilience of your body. Practicing microneedling at home for beginners is an act of self-care that flourishes with patience and consistency. You're not just changing your complexion; you're cultivating a deeper connection with your home sanctuary. If you're ready to elevate your evening routine, explore our curated collection of skincare essentials to find your perfect match.
Nurturing the Glow: Post-Treatment Care and Essential Rituals
The moments following your session are just as vital as the treatment itself. Your skin is now a delicate canvas, its micro-channels open and ready to receive nourishment. During the first 24 hours, your primary goal is protection and hydration. Avoid any products containing Retinol, Vitamin C, or Alpha Hydroxy Acids (AHAs), as these potent actives can cause significant irritation on compromised skin. Instead, reach for pure hyaluronic acid or ceramides to lock in moisture. For microneedling at home for beginners, the golden rule is simplicity. Keep your face away from direct sunlight and avoid heavy sweating for at least 48 hours to ensure the healing process remains undisturbed.
Establishing a rhythm is the secret to lasting transformation. While it's tempting to reach for your roller frequently, your skin requires time to rebuild its collagen structures. Most dermatological studies suggest a 28-day cycle for skin cell turnover. Consequently, beginners should limit treatments to once every 4 to 6 weeks. This patience allows the deeper layers of the dermis to strengthen without the risk of chronic inflammation. By respecting this natural pace, you turn a technical procedure into a mindful ritual of self-care.
Advanced Synergy: LED and Massage
You can elevate your results by integrating gentle technologies that support the skin's recovery phase. The Photon Therapy Red Light Facial Mask is a perfect companion; red light at wavelengths between 630nm and 700nm has been shown to accelerate tissue repair and reduce redness by 30% after just one session. On the days between treatments, using a 3D Facial Massage Instrument encourages lymphatic drainage. This gentle movement helps clear away toxins and reduces puffiness, ensuring your home sanctuary feels like a professional spa. These tools work in harmony to create a comprehensive beauty kit that prioritizes long-term health over quick fixes.
Long-term Maintenance and Replacement
Safety in microneedling at home for beginners relies heavily on the integrity of your equipment. Dull or microscopic hooks on the needles are the primary cause of skin dragging and unnecessary trauma. Adhere to the 3-month rule: even if your roller looks perfect to the naked eye, the needles lose their surgical precision after 10 to 12 uses. Replace your device every 90 days to maintain the highest safety standards. If you ever drop your roller, discard it immediately; even a single bent needle can cause invisible scarring that takes months to heal.
Watch for specific signs that your tool has reached the end of its life:
- A "tugging" sensation during the rolling process.
- Increased redness that persists longer than 48 hours.
- Visible dullness or loss of shine on the needle tips.
- Any resistance when the drum rotates.
Creating a serene environment for your skincare journey means choosing quality and consistency over intensity. As you master these essential rituals, you'll find that beauty isn't found in a single session but in the thoughtful maintenance of your skin's natural resilience. Your home becomes a haven of rejuvenation, where every choice is an invitation to slow down and embrace the art of living beautifully. Trust the process, honor the recovery, and enjoy the quiet confidence that comes with a truly healthy, nurtured glow.
Embrace Your Personal Ritual of Radiance
Transforming your skin doesn't require a clinical atmosphere when you can create a sanctuary in your own bathroom. By selecting a device with 0.25mm needles, you prioritize safety while gently encouraging your skin's natural collagen production. Our 2026 research highlights that a 15 minute mindful session once a week significantly improves texture and serum absorption. Mastering microneedling at home for beginners is about more than just results; it's about the art of slow living and self-care. When you use premium medical grade materials, you ensure your skin receives the thoughtful care it deserves. We've curated our tools to help you find joy in these small, transformative details. It's time to turn your daily routine into a serene experience that leaves you glowing.
Begin your journey to radiant skin with our Professional Micro Needle Roller. Each roller is curated for beginners and crafted from premium medical grade materials for your peace of mind. We offer fast global delivery from our UAE warehouse, ensuring your new ritual arrives in 3 to 5 business days. You deserve a home that feels like a haven, and we're here to help you live more happily every day.
Frequently Asked Questions
Does microneedling at home hurt?
Most people describe the sensation as a light, prickly tickle rather than actual pain, rating it a 2 on a 10-point scale. It shouldn't feel aggressive or cause distress in your quiet sanctuary. If you use a needle length of 0.25mm, the experience remains a comfortable and soothing part of your mindful skincare routine.
How often should a beginner do microneedling?
When starting microneedling at home for beginners, you should limit your sessions to once every 4 to 6 weeks. This timeline respects the skin's 28-day natural renewal process and ensures you don't overwork your complexion. Rushing the ritual can disrupt your skin's serenity, so patience is key for a thoughtful, healthy glow.
What should I put on my skin after microneedling?
Apply a generous layer of pure hyaluronic acid serum to your face within 60 seconds of finishing your session. This helps lock in moisture while your pores are receptive and thirsty for hydration. Avoid using products with Vitamin C or Retinol for at least 72 hours, as these potent ingredients can be too intense for your freshly treated skin.
Can I use a dermaroller on active acne or breakouts?
You should never use a roller on active acne, cysts, or open wounds. Rolling over a breakout can spread bacteria to 100% of the surrounding skin, potentially causing an infection that lasts 14 days or longer. Instead, wait until your skin is clear and serene before continuing your curated microneedling practice to avoid unwanted inflammation.
How do I properly clean and sanitize my microneedle roller?
Submerge your roller in a small glass of 70% isopropyl alcohol for exactly 10 minutes before and after each session. This ensures that 99.9% of bacteria are removed from the needles. Rinse the tool with warm water and let it air dry in a clean, serene spot before tucking it away in its curated case.
How long does it take to see results from at-home microneedling?
Most enthusiasts see a brighter complexion within 48 hours, though collagen synthesis requires 3 to 6 months of regular practice. Clinical studies from the Journal of Cutaneous and Aesthetic Surgery show that skin texture improves by 40% after three sessions. Practicing microneedling at home for beginners is a slow, beautiful journey toward a more radiant reflection.
Is there any downtime after a home microneedling session?
Downtime is minimal, usually lasting between 12 and 24 hours of slight pinkness similar to a mild sunburn. It's best to perform your session on a Friday night so your skin can rest and recover over the weekend. By the 48-hour mark, any lingering sensitivity usually fades, leaving you with a refreshed and joyful glow for the week ahead.
Can I microneedle under my eyes?
Yes, you can treat the under-eye area, but you must use a needle length of only 0.25mm and a very light touch. Because the skin under your eyes is 0.5mm thick, which is 40% thinner than your cheeks, a gentle approach is essential. Treat this delicate haven with extra care to avoid bruising or irritation during your evening ritual.